Uploading file with React.js and Node.js

    Jun 14, 2019       by Pankaj Kumar
uploading-file-react-nodejs.jpg

In this article, I am going to create a sample application explaining file upload in the React.js app with the help of Node.js and MongoDB at the server-side. As a developer, it's a very frequent task to upload the file on the server from the front end.


Here we will be having two different app, One react.js app for performing the client-side stuff, and another app in Node.js using Express and multer for performing the uploading the file at server end task.

Let's Get Started


Step 1: Create basic React app

npm create-react-app file-upload-react-node


Once the project is created, move to project folder over terminal with command cd file-upload-react-node/ and start the newly created app with npm start command. Now the created app is viewable at the browser on URL: http:localhost:3000


Step 2: Install Bootstrap 4

Now install bootstrap 4 in React app, It's optional, If not needed any kind of styling you can skip to install it.

npm install bootstrap --save


Add bootstrap css file in App.js file inside src folder:

import '../node_modules/bootstrap/dist/css/bootstrap.min.css';


Step 3: Install Axios library

Install Axios library to make HTTP request in React app. If you have not heard about Axios library, Click here to know more about this library.

npm install axios


Step 4: Create a new component for file upload

Create a new file named file-upload.js, you can name it as per your convenience


import React, { Component } from 'react';
import axios from 'axios';
 
export default class FileUploadComponent extends Component {
 
  constructor(props) {
    super(props);
 
    this.onFileChange = this.onFileChange.bind(this);
    this.onSubmit = this.onSubmit.bind(this);
 
    this.state = {
        image: ''
    }
  }
 
  onFileChange(e) {
      this.setState({ image: e.target.files[0] })
  }
 
  onSubmit(e) {
      e.preventDefault()
      const formData = new FormData()
      formData.append('image', this.state.image)
      axios.post("http://localhost:3001/api/user-profile", formData, {
      }).then(res => {
          console.log(res)
      })
  }


  render() {
    return (
      <div className="container">
        <h3>React File Upload</h3>
        <hr/>
        <div className="row" style={{marginTop:'40px'}}>
        <div className="col-md-4 offset-md-4">
        <form onSubmit={this.onSubmit}>
            <div className="form-group">
                <input type="file" onChange={this.onFileChange} />
            </div>
            <div className="form-group">
                <button className="btn btn-primary" type="submit">Upload</button>
            </div>
          </form>
        </div>
        </div>
      </div>
    )
  }
}


In the above code, We have done below:

  • We have declared the constructor and set the image state and binded the events.
  • In the file input field, we passed the onChange event(which will update the value of state on change of file) along with the onSubmit method on the form.
  • In the onSubmit method, we manage the file value using the FormData interface, and then we are making the HTTP POST request using the Axios post() method.


Add newly created component in App.js with adding below line at top section.

import FileUploadComponent from './file-upload';


Step 5: Create Node Server

Here we will create a server to manage the file upload task at the server end. We will use Nodejs with Express, MongoDB and Multer. To create folder named server and run below command from terminal after moving into the server folder.

Create package.json file inside the server folder with below command:

npm init


Now, install needed package with below command

npm install mongoose express cors body-parser uuid multer


Step 6: Create a connection with MongoDB

Create a file named db.js inside the shared folder for making the connection with MongoDB.


module.exports = {
    db: 'mongodb://localhost:27017/react-node-file-upload'
};


Step 7: Create a Schema

create a file named User.js inside shared folder.


const mongoose = require('mongoose');
const Schema = mongoose.Schema;
 
const userSchema = new Schema({
  _id: mongoose.Schema.Types.ObjectId,
  image: {
    type: String
  }
}, {
collection: 'users'
})
 
module.exports = mongoose.model('User', userSchema)


In the above file, the react img key is declared to store the name of the image uploaded.


Step 8: Create Service file

Create file named user.js inside the services folder for performing the file upload task with the insertion of data in MongoDB.


let express = require('express'),
multer = require('multer'),
mongoose = require('mongoose'),
uuidv4 = require('uuid/v4'),
router = express.Router();
 
// User model
let User = require('../models/User');
 
const DIR = './public/';
 
const storage = multer.diskStorage({
destination: (req, file, cb) => {
cb(null, DIR);
},
filename: (req, file, cb) => {
const fileName = file.originalname.toLowerCase().split(' ').join('-');
cb(null, uuidv4() + '-' + fileName)
}
});
 
var upload = multer({
storage: storage,
fileFilter: (req, file, cb) => {
if (file.mimetype == "image/png" || file.mimetype == "image/jpg" || file.mimetype == "image/jpeg") {
cb(null, true);
} else {
cb(null, false);
return cb(new Error('Only .png, .jpg and .jpeg format allowed!'));
}
}
});
 
router.post('/user-profile', upload.single('image'), (req, res, next) => {
const url = req.protocol + '://' + req.get('host')
const user = new User({
_id: new mongoose.Types.ObjectId(),
name: req.body.name,
image: url + '/public/' + req.file.filename
});
user.save().then(result => {
res.status(201).json({
message: "User registered successfully!",
userCreated: {
_id: result._id,
image: result.image
}
})
}).catch(err => {
console.log(err),
res.status(500).json({
error: err
});
})
})
 
module.exports = router;


Step 9: Create a Server

create a file named server.js inside root of the project.


let express = require('express'),
mongoose = require('mongoose'),
cors = require('cors'),
bodyParser = require('body-parser'),
dbConfig = require('./shared/db');
 
const api = require('./services/user')
 
// MongoDB Configuration
mongoose.Promise = global.Promise;
mongoose.connect(dbConfig.db, {
useNewUrlParser: true
}).then(() => {
console.log('Database sucessfully connected')
},
error => {
console.log('Database could not be connected: ' + error)
}
)
 
const app = express();
app.use(bodyParser.json());
app.use(bodyParser.urlencoded({
extended: false
}));
app.use(cors());
 
app.use('/public', express.static('public'));
 
app.use('/api', api)
 
const port = 3001;
 
app.use((req, res, next) => {
// Error goes via `next()` method
setImmediate(() => {
next(new Error('Something went wrong'));
});
});
 
app.use(function (err, req, res, next) {
console.error(err.message);
if (!err.statusCode) err.statusCode = 500;
res.status(err.statusCode).send(err.message);
});
 
app.listen(port, () => {
console.log('App is running on port: ' + port)
})


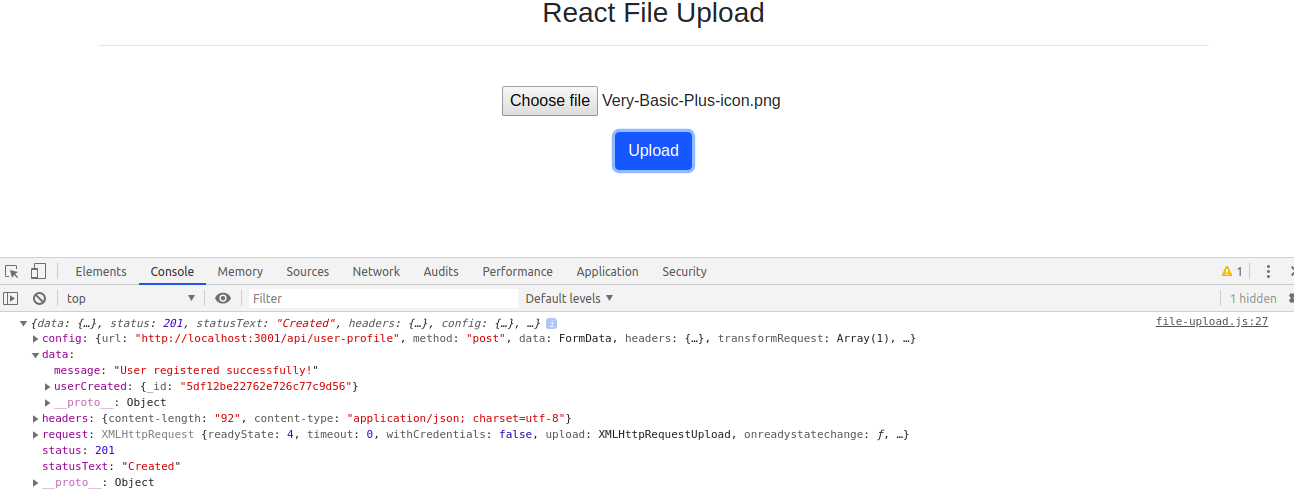
Step 10: Run both client and server app

Now run both the app with npm start command on separate tabs on terminal. After uploading and submitting the image you will get below response on terminal.

image upload react node


Conclusion

Uploading file in React.js app is not very hard and fast job, It can be achieved very easily in a few minutes.  In this article, we learn to upload file with React.js and Node.js

If you are new to React.js then find Reactjs Sample Projects to start the app for enterprise-level application

Let me know your thoughts over the email demo.jsonworld@gmail.com. I would love to hear them and If you like this article, share it with your friends.


Thank You!

Find complete source code over GitHub